
導入
スマホが幅広く浸透している昨今、モバイルアプリはますます重要になっています。
しかし、従来のモバイルアプリ開発では、iPhoneとAndroidそれぞれ別々にアプリを開発する必要がありました。
このようなOS別にそれぞれ開発する手間をなくし、同じコードで同時に開発ができるようにしたのが、クロスプラットフォーム開発ツールです。
代表的なものに、FlutterやReact Native、.NET MAUIなどがあります。
| Flutter | React Native | .NET MAUI | |
|---|---|---|---|
| 開発企業 | Meta (Facebook) | Microsoft | |
| リリース年 | 2018年 | 2015年 | 2022年 |
| スター数 (7月末時点) | 143,000 | 104,000 | 16,400 |
| 言語 | Dart | JavaScript, TypeScript | C# |
| 対応プラットフォーム | iOS, Android, Web, Windows, macOS, Linux | iOS, Android, (Web, Windows) | iOS, Android, Windows, macOS |
| ��ホットリロード | 〇 | 〇 | 〇 |
| UI | 独自UI | ネイティブUI | ネイティブUI, 独自UI |
| 宣言的UI | 〇 | 〇 | 〇 |
.NET MAUIはリリースされてから間もないので、実質FlutterかReact Nativeの二択になると思います。
今回は、対応プラットフォームが1番多いFlutterを用いて、マルチプラットフォーム対応の簡単な自己紹介アプリを作ってみます。
開発環境
今回アプリ開発に用いた環境は以下の通りです。
OS: Windows11 Enterprise
SDK: Flutter 3.0.5
エディタ: VSCode 1.69.2
エミュレータ: Android Studio 2021.2.1 (Android用), Visual Studio 2022 Version 17.2.5 (Windows用)
今回はWindowsを用いているため、AndroidとWindowsアプリのみ試すことができます。
iPhoneとmacのアプリを試したい場合は、macを準備する必要があります。
環境構築
環境構築は意外と手こずります。
Windowsの場合はこちらの記事が非常に参考になりました。
あとはエラーが出たら、その都度検索をして対応す�ると良いと思います。
アプリの開発
環境構築が完了し、flutter createでプロジェクトを作成したらアプリ開発に取り組んでいきます。
今回はFlutterを初めて触るため、レイアウトやエミュレータの実行など、基本的な操作を学ぶことを目的に、簡単な自己紹介アプリを作成しました。
具体的なコードは以下の通りです。
lib/main.dart
import 'package:flutter/material.dart';import 'package:url_launcher/url_launcher.dart';
void main() => runApp(const MyApp());
class MyApp extends StatelessWidget { const MyApp({Key? key}) : super(key: key);
@override Widget build(BuildContext context) { return MaterialApp( title: '自己紹介', theme: ThemeData(primarySwatch: Colors.blue), home: Scaffold( appBar: AppBar( title: const Text( '自己紹介', style: TextStyle(color: Colors.white), ), backgroundColor: Colors.blue, ), backgroundColor: Colors.grey[200], body: Center( child: Column( mainAxisAlignment: MainAxisAlignment.center, children: <Widget>[ Container( width: double.infinity, height: 80, // 背景色 color: Colors.white, margin: const EdgeInsets.all(20), alignment: Alignment.center, child: Row( mainAxisAlignment: MainAxisAlignment.center, children: <Widget>[ Image.network( 'https://bel-itigo.com/static/7ad5a96a2230ecb7c10cb4a9fc3d90bc/5a46d/site-icon.png', width: 50, height: 50, ), const SizedBox( width: 10, ), const Text( 'ベル15', style: TextStyle( fontSize: 30, fontWeight: FontWeight.bold, ), ), ], ), ), Expanded( child: Container( decoration: BoxDecoration( // 角丸 borderRadius: BorderRadius.circular(8), // 背景色 color: Colors.white, ), width: double.infinity, height: 300, margin: const EdgeInsets.all(20), child: SingleChildScrollView( child: Column( crossAxisAlignment: CrossAxisAlignment.stretch, children: [ Container( margin: const EdgeInsets.all(5), child: Column( crossAxisAlignment: CrossAxisAlignment.stretch, children: const [ Text( '自己紹介', style: TextStyle( color: Colors.black, fontSize: 20, fontWeight: FontWeight.bold, ), ), SizedBox( height: 5, ), Text( 'Web開発やアプリ開発など興味がある分野についてブログを書いています。バックエンドを中心にフルスタックエンジニアを目指しています。PHP, JavaScript, TypeScript, Java, Python使えます。', ), ], ), ), Container( margin: const EdgeInsets.all(5), child: Column( crossAxisAlignment: CrossAxisAlignment.stretch, children: [ const Text( 'ブログ', style: TextStyle( color: Colors.black, fontSize: 20, fontWeight: FontWeight.bold, ), ), const SizedBox( height: 10, ), Center( child: ElevatedButton( style: ElevatedButton.styleFrom( primary: Colors.blue, onPrimary: Colors.black, padding: const EdgeInsets.all(20), ), onPressed: () async { final url = Uri.parse( 'https://bel-itigo.com/', ); if (await canLaunchUrl(url)) { launchUrl(url); } }, child: const Text( 'ブログページを開く', style: TextStyle( color: Colors.white, fontSize: 16, ), ), ), ), ], ), ), Container( margin: const EdgeInsets.all(5), child: Column( crossAxisAlignment: CrossAxisAlignment.stretch, children: [ const Text( 'SNS', style: TextStyle( color: Colors.black, fontSize: 20, fontWeight: FontWeight.bold, ), ), const SizedBox( height: 10, ), Center( child: Row( mainAxisAlignment: MainAxisAlignment.center, children: [ GestureDetector( onTap: () async { final url = Uri.parse( 'https://twitter.com/bpeldi2oerkd8', ); if (await canLaunchUrl(url)) { launchUrl(url); } }, child: Image.asset( 'images/twitter-logo-blue-2021.png', width: 50, height: 50, ), ), const SizedBox(width: 20), GestureDetector( onTap: () async { final url = Uri.parse( 'https://github.com/bpeldi2oerkd8', ); if (await canLaunchUrl(url)) { launchUrl(url); } }, child: Image.asset( 'images/GitHub-Mark-64px.png', width: 50, height: 50, ), ), ], ), ), ], ), ), Container( margin: const EdgeInsets.all(5), child: Column( crossAxisAlignment: CrossAxisAlignment.stretch, children: [ const Text( 'ポートフォリオ', style: TextStyle( color: Colors.black, fontSize: 20, fontWeight: FontWeight.bold, ), ), const SizedBox( height: 5, ), ListView( shrinkWrap: true, children: <Widget>[ GestureDetector( onTap: () async { final url = Uri.parse( 'https://github.com/bpeldi2oerkd8/lattendance', ); if (await canLaunchUrl(url)) { launchUrl(url); } }, child: Card( shape: RoundedRectangleBorder( side: BorderSide( color: Colors.grey.shade100, ), ), margin: const EdgeInsets.all(5), child: Padding( padding: const EdgeInsets.all(10), child: Column( crossAxisAlignment: CrossAxisAlignment.stretch, children: const [ Text( '出席管理ツール(Express/Node.js)', style: TextStyle( color: Colors.black, fontSize: 20, fontWeight: FontWeight.bold, ), ), SizedBox( height: 5, ), Text( ' APIによる連携を含めた出席管理ツール。', ), ], ), ), ), ), GestureDetector( onTap: () async { final url = Uri.parse( 'https://github.com/bpeldi2oerkd8/technical-article-checker', ); if (await canLaunchUrl(url)) { launchUrl(url); } }, child: Card( shape: RoundedRectangleBorder( side: BorderSide( color: Colors.grey.shade100, ), ), margin: const EdgeInsets.all(5), child: Padding( padding: const EdgeInsets.all(10), child: Column( crossAxisAlignment: CrossAxisAlignment.stretch, children: const [ Text( '技術記事チェッカー(React/Typescript)', style: TextStyle( color: Colors.black, fontSize: 20, fontWeight: FontWeight.bold, ), ), SizedBox( height: 5, ), Text( 'Create-React-Appを用いた技術記事チェッカー。', ), ], ), ), ), ), ], ), ], ), ), ], ), ), ), ), ], ), ), ), ); }}各部分について今回の記事では解説しません。
詳しく知りたい部分は都度、該当するWidgetを検索してもらえればと思います。
Flutterのレイアウトの基本(HTML/CSS, React Nativeとの違い)については、時間があれば別途記事にしたいと思っています。
アプリのデモ
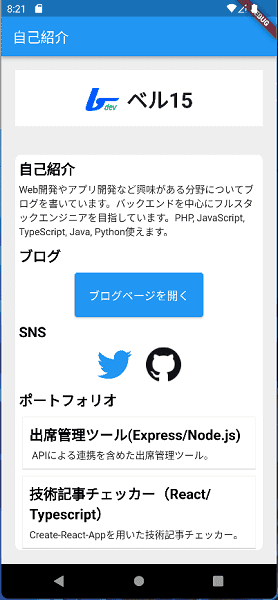
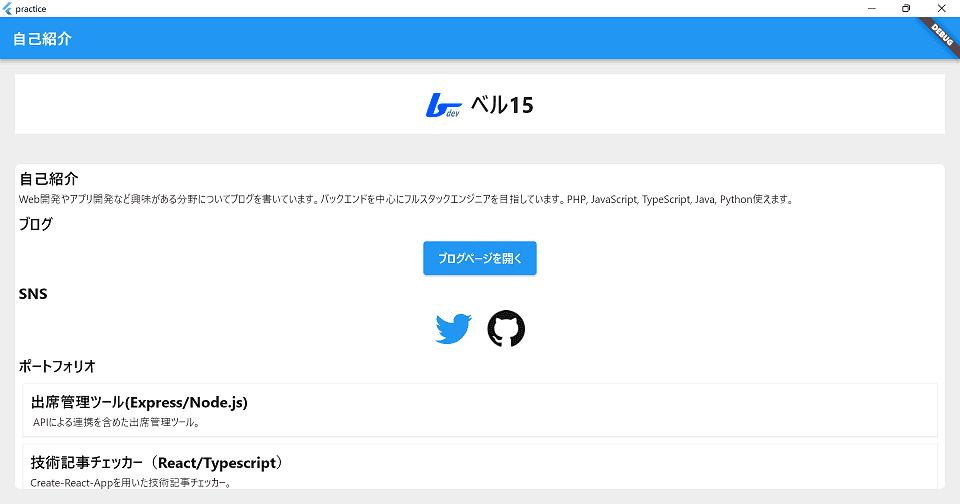
それでは、完成したアプリをAndroidとWindowsのエミュレータで動かしてみます。
動かした結果が以下の画像です。
アイコンの中央添えやボタンを押すとリンクが開くなど、基本的なレイアウトや動作が実装されていることが確認できました。
Androidの場合
Windowsの場合
まとめ
今回はFlutter3で簡単な自己紹介アプリを作成してみました。
実際にアプリを作成し、動かすことでFlutterでのアプリ開発の基本を学ぶことができました。
Flutterは環境構築さえしてしまえば、簡単にクロスプラットフォーム開発ができる非常に便利なツールであることがわかりました。
HTML/CSSとはレイアウトの考え方が若干違うこともあり、最初は戸惑いもありましたが、実際にパーツを配置していくことですぐに慣れると思います。
今後はFirebaseと連携させ、1つ本格的なアプリを作ることで、Flutterの理解を深めていきたいと思います。
